
Tutorial: How To Tackle A Read-Through
A step-by-step guide on how to read through your drafts and create a great set-up to make editing a lot less daunting.

Ah, the read-through of a first draft. Don’t you just love the never-ending typos, two sentences twisted together so thoroughly you have no clue what you where trying to say in the first place, the random names assigned to characters and places that keep changing throughout the story?
Sigh.
Yeah, me too.
No really, I love the messiness of my first drafts. Or rather, I learned to love them and see them for what they are: a work in progress. One full of errors and mistakes and plot holes, and yet, the bones are always there. The foundation of the story I want to tell is buried inside the rubble, and I just love to push up my sleeves, dig my fingernails into the dirt and pull the story to the surface.
While reading through my first draft of The Serpent Prince1, I thought it might be fun to share how I work through my read-throughs. I have a system I’ve been using for years, and maybe some of it will be of use to you too.
I’m a digital-working kind of woman. Meaning I rarely print until I’m in the final stages of my work2. So this little tutorial will be on how I do my digital read-throughs of a draft. You could definitely change this to pen and paper if you want to, though. Simply swap the document for a printed version, grab some markers and post-its, and you’ll be just fine.
Without further ado, here’s how I do read-throughs and what items you’ll need to do it too:
What you need
Digital edition:
A digital PDF version of your draft
A new, blank document page
Printed edition (just in case you’d prefer this, here’s a list):
A printed version of your draft
Post its
Colored markers
Pencil(s)
Tutorial: How To Tackle The Read-Through
A step-by-step guide on how to read through your drafts and create a great set-up to make editing a lot less daunting.
Step 1: Make A List Of Changes
Before you start reading, open your shiny blank document. Write down a list of things you already know you’ll want to change in your next draft. If you’re like me, you might have started this list already while drafting. Yet I always end up adding to this list once I’ve finished the draft and have let it simmer for a while. I add any and everything I can think of; name changes, chapters I possibly want to add, edit or delete, stuff that needs to be deepened out, character arcs that need tweaking, etc.
Just make sure to have a finished list BEFORE you start your read-through. This way, your brain gets some breathing room; you already know you want to change X, so you can push it aside when you come across it in your read-through and look for other plot holes, mess-ups and changes you didn’t realize where there while drafting. At the same time, whenever you come across something that influences a change you already wrote down on the list, you can quickly mark it to keep from creating new plot holes in your next draft. (I hope it goes without saying, but anything you find while reading the draft that needs changing, you add to your Changes-List as you go.)
Step 2: A Visual Key
Before you get to your read-through, there’s one more step. Making a visual key. No, not a key to unlock a door with, silly. I mean a visual, color-coded key to use for marking paragraphs, sentences and words in your document. Since I work digitally, I add the visual key to my Changes-List, like this:
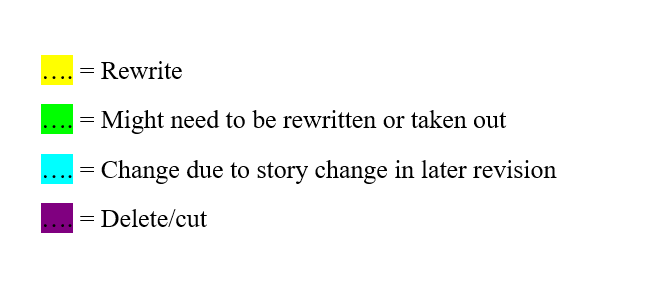
You can use whatever colors and wording you like, and as few or many items as you like. I tend to keep it simple; rewrites I’m certain and less certain about, cuts and big story changes that need to happen or I need to remember while editing the draft later.
Step 3: Read And Highlight As You Go
Finally, it is time to open up your actual draft and read! Remember how I said to make a PDF version of your document? This is where I explain why: to keep from editing as you read.
Sounds simple enough, but I don’t think I know a single writer who is capable of opening a document and reading it without trying to edit (from entire chapters to mere typos). If you can do this, than all the power to you (And please, share your secrets with the crowd). I, however, can’t. My fingers will be itching to edit every time I open the Word document. So I make a PDF instead. I can read, highlight and make notes within the document, but I can’t actually change anything. I’m forced to read on and can’t get caught editing entire paragraphs or chapters instead.
Basically, this is the digital equivalent of printing out a draft and writing in the margins/highlighting with markers. It’s just digital and thus environmentally friendly. So make a PDF version and read and highlight to your heart’s content!
Step 4: Make A Game Plan
You’ve read your draft from page 1 right until the beautifully typed “The end.” Your PDF document is filled to the brim with notes on the sideline, colored markings are bursting from the pages and your Changes-List is easily 10 pages long (More or less, we’re not really counting). So… Now what?
You make a game plan, of course! Decide how you want to tackle everything you discovered in this draft. Will you start with typos first? Or will you be adding the chapters you feel are still missing? Maybe you’re like me, and you will CNTL+H all the names and words you want changed, first. Below’ is a small example of a game plan, for reference.
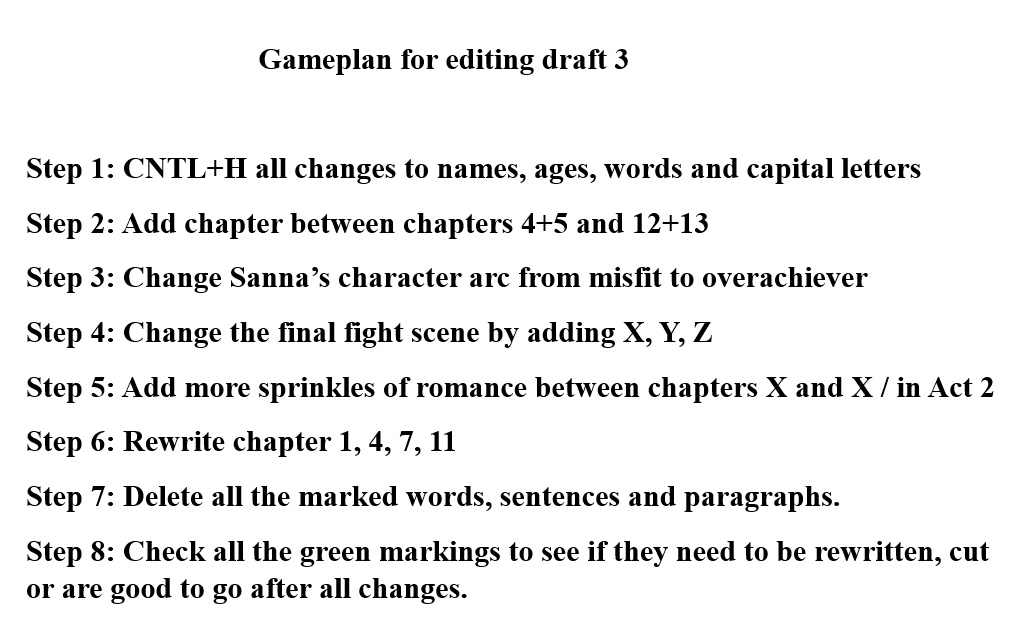
It’s up to you how you start. But you’ve already made a list of everything you want to do different in your next draft. And if you decide on a simple game plan that you can follow step by step, than I promise you that next draft will feel less daunting. You already did the work; you already know in which order you will tackle all the changes you know will make your story better. All that’s left is to start. So go open that document, look at step 1 of your game plan, and go for it!
Step 5: Editing time!
That’s it. You’re first/second/fifth thorough read-through is done. You’ve found everything you want to polish about your story to truly make it shine. Now it’s time for edits. But we will cover that some other time😉
That’s it. That’s my small tutorial on how to tackle a read-through in a way that will make editing a lot less scary and intimidating! It’s based on how I work on my read- throughs, and it is by no means a foolproof way. It definitely depends on what kind of writer you are. But maybe you found a nugget of inspiration or a small step to add to your own writing regime. If so, I’d love to hear it!
Is there anything specific you do during your read-throughs you think could help a fellow writer out? Share your experience in the comments below!
See you next time!
~ Joyce
Work-in-progress title
If your interested to see if editing without printing is for you, I highly recommend giving it a try! And remember, it’s good for the environment too🌳
Welcome to Substack! Great tutorial on reading through a first draft. I find it fascinating to read about the process of writing a book.